Once I returned to carving linoleum (or its modern cousin, EZ Cut) after a 25-30 year hiatus, I also started following blogs by artists in this block-printing medium. Interestingly, two women stand out among many male shop teachers and amateurs as both exceptional artists and talented teachers. For artistry, I prefer Sherrie York. For instruction on small processes, Belinda DelPesco. Each discusses reduction prints in some detail. I ignored this subject as I carved my first projects, printing single color blocks or multiple blocks for multiple colors.
Reduction block carving is also called suicide carving because you fully print the edition color by color, carving away more detail on the ONE block to ink the next color. There’s no turning back in any type of lino cutting, but in reduction blocks there is also no further printing beyond the first carefully planned edition. If you want to produce an edition of 10, you’re advised to print 20 of the first color. Each mistake in inking, printing, registration, or carving will cost you prints.
For the duration of Amber Keig’s NVC Community Ed. art class this spring, I stopped painting watercolors and focused on relief printing. It was a very small class, and no one else chose this medium. I stayed with Amber’s assignments in basic elements of composition, value, color, etc., and enjoyed her carefully prepared lectures and slideshows of art work. Then when we each worked on individual projects, I carved my blocks and sometimes went two doors down the hall to use the print shop by myself. It was fun, but I had more success printing back in my garage with the wooden spoon as baren, hand rubbing the prints. This was even the case with my largest subject, a 12×14 image of an oak tree.
As the semester came close to ending, I decided to try a reduction block so I could confer with Amber, a schooled printmaker, on my process. She encouraged us all to notice the bamboo that grows outside the classroom door. I sketched it and decided I had an image I liked but had invested little enough time in to risk sacrificing to my first attempt at a reduction block. Whatever happened, I would learn something.
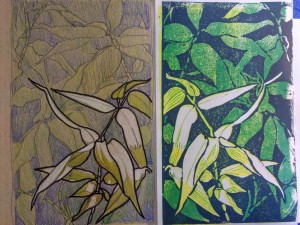
Here’s the original sketch:

I decided to try to print 4 times: a yellow, a light green, a more neutral green and a blue. It helps with these projects to visualize what you want it to look like at the end, but that doesn’t mean one knows how to get there. I keep getting hung up on the differences between this medium and watercolor, especially regarding transparency, layering colors, or even mixing inks to create color.
Sure enough, I made mistakes at each stage in the process. One early error I made was in the 2nd carving to reveal the light-infused green of the sun-struck bamboo. It was almost enough to make me throw in the towel. Dang. I persisted so I could accumulate more mistakes and lessons.
Here are the stages and some of the lessons. As always, any attempt to acquire a technique (especially from such a meticulous online demonstrator as Belinda Del Pesco) reveals my own sloppy habits to me.
First carving of block was straight forward: carve out the whites only. Print yellow. Or so I thought. But when I started carving for the second color, I was partway through the process before I realized I wanted light green highlights on the leaves themselves, not around them. 
This is a constant challenge in carving for relief printing, remembering what is negative space and what is positive. One doesn’t carve the color that will be printed. It is the uncarved surface after carving.

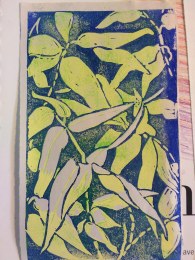
Third carving, below, shown not as an addition to the others but as a separate print. I forgot to take a photo of this stage of the “edition” but liked the image enough to make a separate one color print before carving for the next color. Notice the uneven inking. Speedball water soluble inks.

Fourth carving and inking, both versions below. The one on the left I arrived at after seeing that the background blue on the right was too close in value to the background green. The poor ink adhesion on these is only partly due to the quality of the ink itself. In reduction printing, one should let each color dry completely. A push and pull between wet ink on the print and new ink on the block does not yield good results. In fact, any ink layer after the first one may take longer to dry than the first because the ink sits on another layer of ink, not being absorbed into the paper. I was so eager to see results, I completed all in 24 hours. This, remember, I like to attribute to my style. Insert sheepish smile emoticon.

Final result next to original drawing. Not too bad for a first attempt.
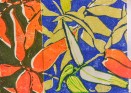
Here is another result of the one edition, possible because I skipped a color on one print.
 Yellow, green #1 and blue (skipping green #2)
The block its elf was still interesting at the end of the process. By then I also had a new ink, Akua Ultramarine Blue intaglio ink. It was rich and wonderful so I used it to create a single color print of the block.

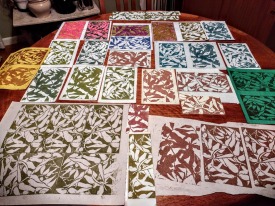
 To be called an edition, all the prints in a reduction series should match: same colors, same careful registration, same ink coverage. I was aiming for 5-8 and started with 13. I don’t think I have more than 3 that match and that only in that they have similar weaknesses. It was a day of lessons and I enjoyed it.
But I wasn’t done. I decided the final carved block was so delightful I carved a partner to it so I could use the two blocks to make two color prints. As often happens in printing as in watercolor, less is more. That is, each block printed alone left enough unprinted white space to be appealing on its own. I have returned to watercolor painting as summer nears, but when a cool morning presents itself, I sometimes go out to the garage, tear some good quality printmaking paper and some newsprint (which also makes an interesting ground) and play with color. Some of the results get cut and glued into collaged cards. I now have Black, Yellow and Red Akua inks. It’s messy and delightful.


I love what you’re doing!